GeoTwitter: Google Maps + Api Twitter

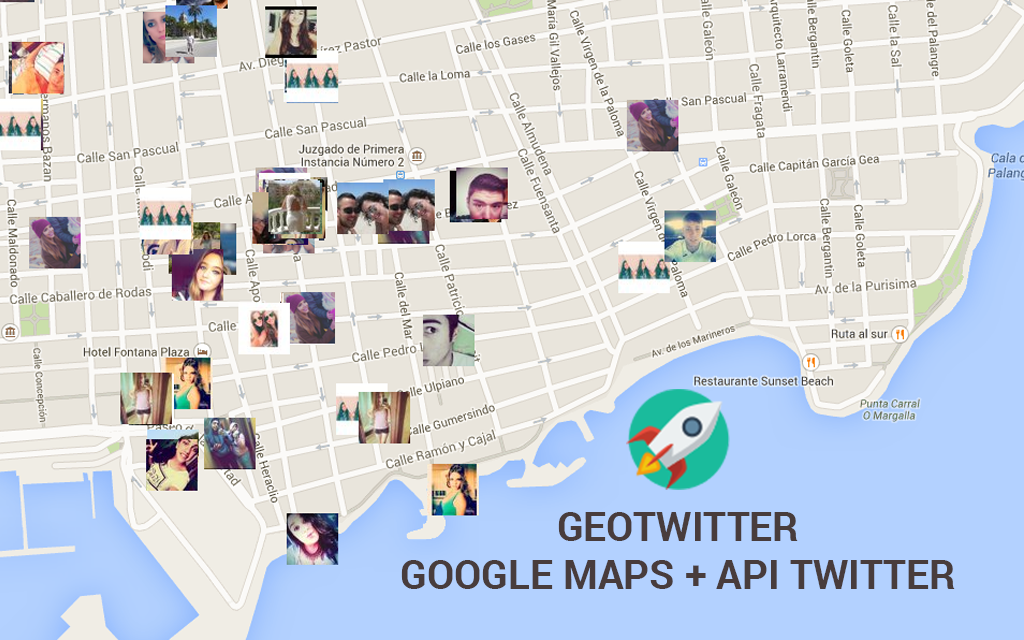

Hola a todos, hace tiempo realicé una aplicación que geolocalizaba tweets a partir del nombre de una ciudad o pueblo, llamada GeoTwitter. Debido a que ya he realizado bastantes tutoriales sobre PHP, Twitter, JSON, es decir tutoriales sobre programación web y que este es mi tutorial número 50, he decidido que este tutorial será una buena práctica para todos aquellos que quieran ver un ejemplo práctico del uso de varios lenguajes de programación. Así pues estar atentos a este extenso tutorial y sobre todo disfrutar de lo que más nos gusta, PROGRAMAR!
Esta aplicación consulta la información pública que twitter proporciona, Geeky Theory no se hace responsable del uso de la misma.
Tutoriales Recomendados
- Serie de tutoriales PHP
- Serie de tutoriales JSON
- Serie de tutoriales API Twitter
- Serie de Tutoriales Api Google Maps
¿Qué lenguajes vamos a usar?
Para desarrollar GeoTwitter vamos a usar tanto lenguajes del lado del servidor (PHP), lenguajes del lado del cliente (HTML, Javascript) así como formatos para el intercambio de datos (JSON). Para que todos estos lenguajes fluyan con integridad tenemos que tener en cuenta las posibilidades de cada lenguajes así como sus limitaciones. Tenemos que tener claro que un lenguaje de servidor carga la página en un inicio y no se puede volver a interactuar con el servidor hasta que no hayamos recargado la página, si queremos interactuar con la página en tiempo real, tenemos que usar lenguajes de cliente, en este caso (Javascript).
Estructura de la aplicación.
La estructura que vamos a realizar es un poco distinta de la explicada en el tutorial "Estructura de un proyecto web", ya que al tener poco código no conviene realizar tanto jaleo! La estructura que seguiremos será la siguiente:
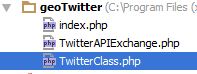
- TwitterAPIExchange: Librería que contiene todas las funciones necesarias para conectar la API con los credenciales del usuario y obtener o realizar de una manera fácil lo que queramos.
- TwitterClass: Clase que contiene las funciones necesarias para proporcionarnos la información requerida.
- index: archivo principal donde escribiremos todo el código de la app.
TwitterClass: Funciones útiles
El archivo TwitterClass contiene la clase Twitter. Esta clase PHP se compone de tres funciones las cuales nos van a proporcionar todo lo necesario para construir la aplicación. Estas tres funciones son las siguientes:
getJsonGeoTweets
getJsonGeoTweets($lat,$lon,$radio,$num_tweets)
Esta función devuelve un vector contenedor de JSONs a partir de las coordenadas indicadas, el radio y el número de tweets que queramos mostrar. La solución aquí mostrada se debe a que por cada petición a la API de Twitter podemos obtener como máximo 100 tweets, así pues si queremos obtener más tweets, tenemos que realizar $num_tweets/100 peticiones. Uno de los problemas que nos puede surgir es que siempre nos devuelva los 100 últimos tweets, esto se resuelve gracias al campo que tiene la api de twitter max_id el cual indica el id del tweet desde el cual empezamos a contar. Por lo tanto manteniendo siempre el id del último tweet consultado, podemos obtener los siguientes 100 tweets. para más información consulten la documentación de la API para este tipo de consulta.
Recordar que para que funcione este método tenemos que añadir los credenciales de nuestra app de twiiter en el inicio del método.
function getJsonGeoTweets($lat,$lon,$radio,$num_tweets){ ini_set('display_errors', 1); require_once('TwitterAPIExchange.php'); /** Set access tokens here - see: https://dev.twitter.com/apps/ **/ $settings = array( 'oauth_access_token' => "", 'oauth_access_token_secret' => "", 'consumer_key' => "", 'consumer_secret' => "" ); //Número de iteraciones $pages = (int)$num_tweets/100; $lastIdTweet = ""; $contenedorJSON = ""; $count = 0; $cuentasTwitter = ""; do{ $url = 'https://api.twitter.com/1.1/search/tweets.json'; if($lastIdTweet == ""){ $getfield = '?geocode='.$lat.','.$lon.','.$radio.'&count=100'; }else{ $getfield = '?geocode='.$lat.','.$lon.','.$radio.'&max_id='.($lastIdTweet)."&count=100"; } $requestMethod = 'GET'; $twitter = new TwitterAPIExchange($settings); $json = $twitter->setGetfield($getfield) ->buildOauth($url, $requestMethod) ->performRequest(); $contenedorJSON[$count] = $json; $count++; $pages--; }while($pages>0); //devolvemos el contenedor de arrays con todos los JSON return $contenedorJSON; }
getInfoTwitter
getInfoTwitter($contenedorJson)
Esta función extrae toda la información necesaria a partir del array de contenedores de JSON que hemos obtenido de la función anterior. La información que vamos a necesitar será la siguiente:
- Latitud y longitud del tweet, en caso de que no se disponga de esta información le asignaremos la longitud y latitud 0,0
- Fecha del tweet.
- Imagen encapsulada en etiqueta <a> con el enlace del usuario.
- Tweet
Toda la información se añade a un array multidimensional indexado tanto por nombre como por índice, finalmente la función devuelve este array.
function getInfoTwitter($contenedorJson){ $count=0; $rawdata = ""; $json = ""; for($i=0;$i<count($contenedorJson);$i++){ $json = $contenedorJson[$i]; $json = json_decode($json); $num_items = count($json->statuses); for($j=0; $j<$num_items; $j++){ $user = $json->statuses[$j]; $id_tweet = $user->id_str; $fecha = $user->created_at; $url_imagen = $user->user->profile_image_url; $screen_name = $user->user->screen_name; $imagen = "<a href='https://twitter.com/".$screen_name."' target=_blank><img src=".$url_imagen."></img></a>"; $tweet = $user->text; if(!empty($user->geo->coordinates[0])){ $latitud = $user->geo->coordinates[0]; $longitud = $user->geo->coordinates[1]; }else{ $latitud = 0; $longitud = 0; } $rawdata[$count][0]=$fecha; $rawdata[$count]["FECHA"]=$fecha; $rawdata[$count][1]=$imagen; $rawdata[$count]["imagen"]=$imagen; $rawdata[$count][3]=$url_imagen; $rawdata[$count]["imagen_url"]=$url_imagen; $rawdata[$count][4]="@".$screen_name; $rawdata[$count]["nombre"]="@".$screen_name; $rawdata[$count][5]=$tweet; $rawdata[$count]["tweet"]=$tweet; $rawdata[$count][6]=$latitud; $rawdata[$count]["latitud"]=$latitud; $rawdata[$count][7]=$longitud; $rawdata[$count]["longitud"]=$longitud; $count++; } } return $rawdata; }
getCoordinates
function getCoordinates($city)
Esta función hace uso de la API Open Weather Map, explicada en el tutorial:
JSON IV – EJEMPLO PRÁCTICO DE USO DE JSON CON OPENWEATHERMAP
Con el objetivo de obtener las coordenadas de una ciudad o pueblo a través de su nombre. Devuelve un array con las coordenadas encontradas.
function getCoordinates($city){ $coor = ""; $html = file_get_contents("http://api.openweathermap.org/data/2.5/find?q=$city"); $json = json_decode($html); $lat = $json->list[0]->coord->lat; $lon = $json->list[0]->coord->lon; $coor["latitud"] = $lat; $coor["longitud"] = $lon; return $coor; }
Script principal (index.php)
Una vez que tenemos todas las funciones que vamos a necesitar para construir nuestro propio geotwitter vamos a pasar a escribir nuestro script principal. Este script vamos a dividirlo en tres partes:
Formulario HTML
En primer lugar, vamos a necesitar un formulario html para que el usuario introduzca la ciudad que quiere "cotillear".
<html> <head> <meta name="viewport" content="initial-scale=1.0, user-scalable=no"> <meta charset="utf-8"> <title>GeoTwitter</title> </head> <body> <form action="" method="get"> <input type="text" name="city" placeholder="City"> <button type="submit">Search</button> </form> <div id="map-canvas"></div> </body> </html>
Podemos observa que hemos añadido un <div> cuyo id vale "map-canvas", este id lo usaremos a la hora de dibuja el mapa, es decir es la posición donde aparecerá el mapa. Por otro lado, el formulario hace una llamada recursiva al mismo archivo. de tal forma que tendremos que comprobar en el mismo archivo (index.php) si disponemos de parámetros GET.
Inicialización de datos (PHP)
Lo primero que tenemos que hacer será inicializar los datos que vamos a usar en nuestra aplicación, es decir, vamos a obtener todos aquellos datos a partir del formulario que ha rellenado el usuario. Como hemos dicho antes, tenemos que comprobar si existe un parámetro GET con el índice city.
<?php require_once 'TwitterClass.php'; $twitter = new Twitter(); if(isset($_GET["city"])){ $coor = $twitter->getCoordinates($_GET["city"]); }else{ $coor = $twitter->getCoordinates("Madrid"); } $contenedorJSON = $twitter->getJsonGeoTweets($coor["latitud"],$coor["longitud"],"1km",200); $data = $twitter->getInfoTwitter($contenedorJSON); ?>
Una vez que hemos obtenido las coordenadas buscadas, llamamos a las funciones que hemos creado en la clase Twitter, obteniendo así finalmente un array multidimensional $data con toda la información almacenada.
Creación del mapa e inserción de datos.
Por último, vamos a crear nuestro mapa con toda la información que hemos obtenido de la API de Twitter. Para poder usar el mapa es importante entender como funciona la API de Google Maps. Es recomendable que todo el código Javascript este dentro de la etiqueta <head></head>.
Para poder usar la API de Google Maps vamos a tener que importar su librería.
<script src="https://maps.googleapis.com/maps/api/js?v=3.exp&sensor=false"></script>
Una vez importada, tenemos que crear un array, el cual le hemos llamado beaches (esto es debido al copy/paste del código de ejemplo de la API). Cada fila de este array contendrá el nombre del usuario del tweet, la longitud, la latitud y un indice que ira de 0 hasta el numero total de elementos.
var beaches = [ <?php for($i=0;$i<count($data);$i++){ //if($i==35) continue; $latitud = str_replace(",", ".", $data[$i]["latitud"]); $longitud = str_replace(",", ".", $data[$i]["longitud"]); $nombre = str_replace("'", "", $data[$i]["nombre"]); if($latitud == 0 && $longitud == 0){ continue; }else{ echo "['$nombre', $latitud, $longitud, $i],\n"; } } ?> ];
Una vez que tenemos este array formado creamos varias funciones que nos ayuden a dibujar el mapa.
initialize
function initialize() { var mapOptions = { zoom: 16, center: new google.maps.LatLng(<?php echo $coor["latitud"] ?>,<?php echo $coor["longitud"] ?>) } var map = new google.maps.Map(document.getElementById('map-canvas'), mapOptions); setMarkers(map, beaches); }
Esta función inicializa el mapa añadiendo las coordenadas que hemos obtenido gracias a la API Open Weather Map. Además añade la distancia inicial del zoom. Podemos observar que finalmente esta función llama a otra función llamada setMarkers.
setMarkers
Esta función dibujará en el mapa todos los tweet a partir de la información añadida en el array beaches.
function setMarkers(map, locations) { // Add markers to the map // Marker sizes are expressed as a Size of X,Y // where the origin of the image (0,0) is located // in the top left of the image. // Origins, anchor positions and coordinates of the marker // increase in the X direction to the right and in // the Y direction down. var image = new Array(); var tweet = new Array(); var user = new Array(); <?php $tweet = ""; for($i=0;$i<count($data);$i++){ echo "var image$i = {\n"; //if($i==35) continue; $imagen = str_replace("'", "", $data[$i]["imagen_url"]); echo "url: '$imagen',\n"; // This marker is 20 pixels wide by 32 pixels tall. echo "size: new google.maps.Size(100, 100),\n"; // The origin for this image is 0,0. echo "origin: new google.maps.Point(0,0),\n"; // The anchor for this image is the base of the flagpole at 0,32. echo "anchor: new google.maps.Point(25,0)\n"; echo "};\n"; echo "image.push(image$i);"; $user = $data[$i]["nombre"]; $user = preg_replace("/@([A-Za-z0-9\/\.]*)/", "<a target=\"_blank\" href=\"http://www.twitter.com/$1\">@$1</a>", $user); echo "user.push('".$user."');"; $tweet = $data[$i]["tweet"]; $tweet = str_replace("'", "", $tweet); $tweet = str_replace("\n", "", $tweet); //$tweet = preg_replace('([^A-Za-z0-9])', ' ', $tweet); //Convert urls to <a> links $tweet = preg_replace("/([\w]+\:\/\/[\w-?&;#~=\.\/\@]+[\w\/])/", "<a target=\"_blank\" href=\"$1\">$1</a>", $tweet); //Convert hashtags to twitter searches in <a> links $tweet = preg_replace("/#([A-Za-z0-9\/\.]*)/", "<a target=\"_blank\" href=\"http://twitter.com/search?q=$1\">#$1</a>", $tweet); //Convert attags to twitter profiles in <a> links $tweet = preg_replace("/@([A-Za-z0-9\/\.]*)/", "<a target=\"_blank\" href=\"http://www.twitter.com/$1\">@$1</a>", $tweet); echo "tweet.push('".$tweet."');"; } ?> // Shapes define the clickable region of the icon. // The type defines an HTML <area> element 'poly' which // traces out a polygon as a series of X,Y points. The final // coordinate closes the poly by connecting to the first // coordinate. var shape = { coord: [1, 1, 1, 100,100, 100, 100 , 1], type: 'poly' }; var markerArray = new Array(); var posicionArray = new Array(); for (var i = 0; i < locations.length; i++) { var beach = locations[i]; var myLatLng = new google.maps.LatLng(beach[1], beach[2]); posicionArray.push(myLatLng); var marker = new google.maps.Marker({ position: myLatLng, map: map, icon: image[i], shape: shape, title: beach[0], zIndex: beach[3] }); markerArray.push(marker); markerEventListener(map,marker,user[i],tweet[i],image[i]); } }
El propósito de esta función es crear de forma iterada casillas en el mapa con toda la información del usuario. Así pues, primero vamos a crear tres arrays donde vamos a introducir información del usuario, información del tweet e información de la imagen del usuario, de tal forma que por cada usuario se añade una información similar a esta:
user.push('<a target="_blank" href="http://www.twitter.com/danniifer108">@danniifer108</a>'); tweet.push('<a target="_blank" href="http://www.twitter.com/Tatiana">@Tatiana</a>_252801 Si nunca les dijeron, "Parecen novios" fracasaron como mejores amigos, a lo bien que sí parce.'); var image233 = { url: 'http://pbs.twimg.com/profile_images/517834109821800448/l1oxiiFn_normal.jpeg', size: new google.maps.Size(100, 100), origin: new google.maps.Point(0,0), anchor: new google.maps.Point(25,0) }; image.push(image232);
Como podemos observa el array image en realidad es un array de arrays donde almacenamos otros arrays con información de la imagen. Una vez que tengamos estos tres arrays, tenemos que crear más elementos para dibujar el cuadro y por último tenemos que crear otro array que almacenará objetos marker, con la información de cada tweets. Finalmente se llamará a la funnción markerEventListener para intercatuar con el cuadro y mostrar la información al hacer click sobre el.
markerEventListener
var infowindow = null; function markerEventListener(map,marker,user,tweet,image){ //map.setZoom(16); //map.setCenter(posicion); var contenido = "<img src='"+image.url+"'></img><h4>"+user+"</h4><br>"+tweet; google.maps.event.addListener(marker, 'click', function(evt) { if(infowindow){ infowindow.close(); } infowindow = new google.maps.InfoWindow(); infowindow.setContent(contenido); infowindow.setPosition(evt.latLng); infowindow.open(map); }); }
Esta función dibuja un cuadro mayor mostrando el contenido del tweet al hacer click sobre el cuadro.
Finalmente tan sólo nos queda inicializar el script:
google.maps.event.addDomListener(window, 'load', initialize);
Anexo: código completo.
Para los más vagos os dejo el código completo de GeoTwitter, espero que lo disfrutéis.
TwitterClass.php
<?php class Twitter{ function getJsonGeoTweets($lat,$lon,$radio,$num_tweets){ ini_set('display_errors', 1); require_once('TwitterAPIExchange.php'); /** Set access tokens here - see: https://dev.twitter.com/apps/ **/ $settings = array( 'oauth_access_token' => "", 'oauth_access_token_secret' => "", 'consumer_key' => "", 'consumer_secret' => "" ); //Número de iteraciones $pages = (int)$num_tweets/100; $lastIdTweet = ""; $contenedorJSON = ""; $count = 0; $count2 = 0; $cuentasTwitter = ""; do{ $url = 'https://api.twitter.com/1.1/search/tweets.json'; if($lastIdTweet == ""){ $getfield = '?geocode='.$lat.','.$lon.','.$radio.'&count=100'; }else{ $getfield = '?geocode='.$lat.','.$lon.','.$radio.'&max_id='.($lastIdTweet)."&count=100"; } $requestMethod = 'GET'; $twitter = new TwitterAPIExchange($settings); $json = $twitter->setGetfield($getfield) ->buildOauth($url, $requestMethod) ->performRequest(); $contenedorJSON[$count] = $json; $count++; $pages--; }while($pages>0); //devolvemos el contenedor de arrays con todos los JSON return $contenedorJSON; } function getInfoTwitter($contenedorJson){ $count=0; $rawdata = ""; $json = ""; for($i=0;$i<count($contenedorJson);$i++){ $json = $contenedorJson[$i]; $json = json_decode($json); $num_items = count($json->statuses); for($j=0; $j<$num_items; $j++){ $user = $json->statuses[$j]; $id_tweet = $user->id_str; $fecha = $user->created_at; $url_imagen = $user->user->profile_image_url; $screen_name = $user->user->screen_name; $imagen = "<a href='https://twitter.com/".$screen_name."' target=_blank><img src=".$url_imagen."></img></a>"; $tweet = $user->text; if(!empty($user->geo->coordinates[0])){ $latitud = $user->geo->coordinates[0]; $longitud = $user->geo->coordinates[1]; }else{ $latitud = 0; $longitud = 0; } $rawdata[$count][0]=$fecha; $rawdata[$count]["FECHA"]=$fecha; $rawdata[$count][1]=$imagen; $rawdata[$count]["imagen"]=$imagen; $rawdata[$count][3]=$url_imagen; $rawdata[$count]["imagen_url"]=$url_imagen; $rawdata[$count][4]="@".$screen_name; $rawdata[$count]["nombre"]="@".$screen_name; $rawdata[$count][5]=$tweet; $rawdata[$count]["tweet"]=$tweet; $rawdata[$count][6]=$latitud; $rawdata[$count]["latitud"]=$latitud; $rawdata[$count][7]=$longitud; $rawdata[$count]["longitud"]=$longitud; $count++; } } return $rawdata; } function getCoordinates($city){ $coor = ""; $html = file_get_contents("http://api.openweathermap.org/data/2.5/find?q=$city"); $json = json_decode($html); $lat = $json->list[0]->coord->lat; $lon = $json->list[0]->coord->lon; $coor["latitud"] = $lat; $coor["longitud"] = $lon; return $coor; } }
index.php
<meta charset="utf-8"> <?php require_once 'TwitterClass.php'; $twitter = new Twitter(); if(isset($_GET["city"])){ $coor = $twitter->getCoordinates($_GET["city"]); }else{ $coor = $twitter->getCoordinates("Madrid"); } $contenedorJSON = $twitter->getJsonGeoTweets($coor["latitud"],$coor["longitud"],"1km",200); $data = $twitter->getInfoTwitter($contenedorJSON); ?> <html> <head> <meta name="viewport" content="initial-scale=1.0, user-scalable=no"> <meta charset="utf-8"> <title>Geotwitter</title> <style> html, body, #map-canvas { height: 100%; margin: 0px; padding: 0px } form,#banner{ padding: 2px; cursor: pointer; display: block; width: 290px; margin: 0 auto; text-align: left; } img,h4{ padding: 2px; cursor: pointer; display: block; margin: 0 auto; text-align: center; } </style> <script src="https://maps.googleapis.com/maps/api/js?v=3.exp&sensor=false"></script> <script> // The following example creates complex markers to indicate beaches near // Sydney, NSW, Australia. Note that the anchor is set to // (0,32) to correspond to the base of the flagpole. function initialize() { var mapOptions = { zoom: 16, center: new google.maps.LatLng(<?php echo $coor["latitud"] ?>,<?php echo $coor["longitud"] ?>) } var map = new google.maps.Map(document.getElementById('map-canvas'), mapOptions); setMarkers(map, beaches); } /** * Data for the markers consisting of a name, a LatLng and a zIndex for * the order in which these markers should display on top of each * other. */ var beaches = [ <?php for($i=0;$i<count($data);$i++){ //if($i==35) continue; $latitud = str_replace(",", ".", $data[$i]["latitud"]); $longitud = str_replace(",", ".", $data[$i]["longitud"]); $nombre = str_replace("'", "", $data[$i]["nombre"]); if($latitud == 0 && $longitud == 0){ continue; }else{ echo "['$nombre', $latitud, $longitud, $i],\n"; } } ?> ]; function setMarkers(map, locations) { // Add markers to the map // Marker sizes are expressed as a Size of X,Y // where the origin of the image (0,0) is located // in the top left of the image. // Origins, anchor positions and coordinates of the marker // increase in the X direction to the right and in // the Y direction down. var image = new Array(); var tweet = new Array(); var user = new Array(); <?php $tweet = ""; for($i=0;$i<count($data);$i++){ echo "var image$i = {\n"; //if($i==35) continue; $imagen = str_replace("'", "", $data[$i]["imagen_url"]); echo "url: '$imagen',\n"; // This marker is 20 pixels wide by 32 pixels tall. echo "size: new google.maps.Size(100, 100),\n"; // The origin for this image is 0,0. echo "origin: new google.maps.Point(0,0),\n"; // The anchor for this image is the base of the flagpole at 0,32. echo "anchor: new google.maps.Point(25,0)\n"; echo "};\n"; echo "image.push(image$i);"; $user = $data[$i]["nombre"]; $user = preg_replace("/@([A-Za-z0-9\/\.]*)/", "<a target=\"_blank\" href=\"http://www.twitter.com/$1\">@$1</a>", $user); echo "user.push('".$user."');"; $tweet = $data[$i]["tweet"]; $tweet = str_replace("'", "", $tweet); $tweet = str_replace("\n", "", $tweet); //$tweet = preg_replace('([^A-Za-z0-9])', ' ', $tweet); //Convert urls to <a> links $tweet = preg_replace("/([\w]+\:\/\/[\w-?&;#~=\.\/\@]+[\w\/])/", "<a target=\"_blank\" href=\"$1\">$1</a>", $tweet); //Convert hashtags to twitter searches in <a> links $tweet = preg_replace("/#([A-Za-z0-9\/\.]*)/", "<a target=\"_blank\" href=\"http://twitter.com/search?q=$1\">#$1</a>", $tweet); //Convert attags to twitter profiles in <a> links $tweet = preg_replace("/@([A-Za-z0-9\/\.]*)/", "<a target=\"_blank\" href=\"http://www.twitter.com/$1\">@$1</a>", $tweet); echo "tweet.push('".$tweet."');"; } ?> // Shapes define the clickable region of the icon. // The type defines an HTML <area> element 'poly' which // traces out a polygon as a series of X,Y points. The final // coordinate closes the poly by connecting to the first // coordinate. var shape = { coord: [1, 1, 1, 100,100, 100, 100 , 1], type: 'poly' }; var markerArray = new Array(); var posicionArray = new Array(); for (var i = 0; i < locations.length; i++) { var beach = locations[i]; var myLatLng = new google.maps.LatLng(beach[1], beach[2]); posicionArray.push(myLatLng); var marker = new google.maps.Marker({ position: myLatLng, map: map, icon: image[i], shape: shape, title: beach[0], zIndex: beach[3] }); markerArray.push(marker); markerEventListener(map,marker,user[i],tweet[i],image[i]); } } var infowindow = null; function markerEventListener(map,marker,user,tweet,image){ //map.setZoom(16); //map.setCenter(posicion); var contenido = "<img src='"+image.url+"'></img><h4>"+user+"</h4><br>"+tweet; google.maps.event.addListener(marker, 'click', function(evt) { if(infowindow){ infowindow.close(); } infowindow = new google.maps.InfoWindow(); infowindow.setContent(contenido); infowindow.setPosition(evt.latLng); infowindow.open(map); }); } google.maps.event.addDomListener(window, 'load', initialize); </script> </head> <body> <form action="" method="get"> <input type="text" name="city" placeholder="City"> <button type="submit">Search</button> </form> <div id="banner"> </div> <div id="map-canvas"></div> </body> </html>
Espero que os haya gustado, no dudéis en difundirlo por vuestras redes sociales.